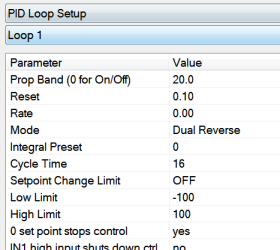
PID Loop Setup
|
|
PID is the tuning parameters entered for each Process Variable loop.
Prop Band (0 for On/Off) Proportional Band determines the response to the current error. The Proportional Band is the percent of the range of the process variable that will produce 100% output and is the inverse of the proportional gain. A low Proportional Band value results in a larger change in output for a given error. Conversely, a high Proportional Band value results in a smaller change in output for a given error. If the Proportional Band is too small, control may oscillate or be otherwise unstable. If the Proportional Band is too large the control action may be too sluggish in response to changes within the system. Note: If the Proportional Band is set to 0.0, only on/off control is performed. The range 0 – 3276.0. |
Reset
Reset determines the influence of past errors. The Reset, or integral action (expressed in repeats per minute), sums the error between the process variable and setpoint over time and adds this accumulated output to the proportional output. A “proportional only” controller generally operates with steady-state error because some error is required to produce control output. The goal of integral action is to drive the steady-state error to zero and eliminate this droop. The range is 0 – 327.67.
Rate
Rate adjusts the response to future errors. The Rate, or derivative action (expressed in minutes), is used to predict system behavior and has a dampening effect. The more the controller tries to change the process variable the harder, the derivative will work to counter that effort. This dampening effect can be valuable in reducing overshoot but is most often useful when trying to improve control on systems with significant and predicable lag. The range 0 – 327.67. NOTE: The rate is not typically used for carbon control.
Mode
This is the mode of the loop. The values are: Dual Reverse, Single Reverse, Dual Direct, or Single Direct.
Dual – This has two output relays which can increase and decrease to achieve your SP.
Single – This has one relay which works in only one direction to achieve your SP.
Direct - If the PV - SP equals a positive number and the output would bring the PV down toward setpoint that is direct.
Reverse – If the PV - SP equals a negative number and the output would bring the PV up toward setpoint then that is reverse
Example: If a 12 mA output drives a 0 degree F temperature (PV) UP to a 1200 degree F temperature (SP), this would be REVERSE, and since this would take a SINGLE output from the controller, the Mode for the Temperature Loop is Single Reverse.
Integral Preset
This field provides an offset for the starting point for PID control, also referred to as “Load Line” or “Manual Reset”. The range is –100 to 100.
Cycle Time
This field is typically set to the valve travel time multiplied by 1.5. The range is 0 – 300.
Setpoint Change Limit
This is a smart time feature that allows Process Loop to use PB only without Reset until the Process Variable drops below the percent output set under this category.
It is used to eliminate overshoot.
The Output percentage selected under this category must be above the normal operating output percentage of the furnace at heat.
The options are: OFF, 80%, 70%, 60%, 50%, 40%, 30%, or 20%.
Example: If the furnace runs at 40% output at heat for the maximum load, the setpoint change limit should be set to 60%.
Low Limit
This is the low limit for the loop. The range is –100 to 100.
High Limit
This is the high limit for the loop. The range is –100 to 100.
0 Setpoint Stops Control
If the Setpoint is zero, then all outputs are turned off. The option is either Yes or No.
IN1 high limit shuts down ctrl
If input 1’s high limit is reached, then all outputs are turned off. The value can either be Yes or No.
IN2 high limit shuts down ctrl
If input 2’s high limit is reached, then all outputs are turned off. The value can either be Yes or No.
IN3 high limit shuts down ctrl
If input 3’s high limit is reached, then all outputs are turned off. The value can either be Yes or No.
PID Auto Switch
This is the PID auto switch field. The value can either be Yes or No.
PID auto switch is a feature within the instrument that allows multiple PID Loops to be used for various temperature ranges. This feature can be extremely helpful when a single PID Loop is not accurate across a wide temperature range. The most common indication that PID auto switching may improve furnace ability is failure to pass Temperature Uniformity Surveys (TUS). In many examples, a certain PID Loop may prevent under- or over-shoot at normal operating temperatures; but produce unacceptable overshoot at lower temperature.
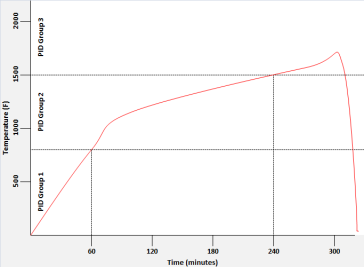
This feature allows the user to utilize (up to) three distinct loops to obtain more accurate heating curves. In most applications, it is helpful to use the built-in Tuning Assistant feature to determine appropriate PID values. These values can be recorded and manually entered as described below. The chart below demonstrates this feature.

In the example above, proper use of the Tuning Assistant allows the user to find the following optimal PID settings for the following temperature ranges:
-
0-800F -> PID Group 1 (P = 1.0, I = 2.0, D = 3.0)
-
801-1500F -> PID Group 2 (P = 1.3, I = 2.3, D = 2.3)
-
1501F+ -> PID Group 3 (P = 1.6, I = 2.6, D = 3.6)
The following settings must be made via the touch screen:
|
Parameter |
Value |
|
PID Loop Setup -> Loop 1 -> PID Auto Switch |
Yes |
|
PID Loop Setup -> Loop 1 -> Switch Point PID 1-2 |
800 |
|
PID Loop Setup -> Loop 1 -> Switch Point PID 2-3 |
1500 |
|
Alternate PID Setup -> LP1 set 1 -> Prop Band |
1.0 |
|
Alternate PID Setup -> LP1 set 1 -> Reset |
2.0 |
|
Alternate PID Setup -> LP1 set 1 -> Rate |
3.0 |
|
Alternate PID Setup -> LP1 set 2 -> Prop Band |
1.3 |
|
Alternate PID Setup -> LP1 set 2 -> Reset |
2.3 |
|
Alternate PID Setup -> LP1 set 2 -> Rate |
3.3 |
|
Alternate PID Setup -> LP1 set 3 -> Prop Band |
1.6 |
|
Alternate PID Setup -> LP1 set 3 -> Reset |
2.6 |
|
Alternate PID Setup -> LP1 set 3 -> Rate |
3.6 |
Switch Point PID 1 -> 2
This is the PID Switch Point field. This is used in conjunction with the PID Auto Switching feature. See the PID Auto Switch section for more information. The range is –300 to 4000. NOTE: PID switch points are based on Temperature PV, not Setpoint or Ramp Temperature.
Switch Point PID 2 -> 3
This is the PID Switch Point field. This is used in conjunction with the PID Auto Switching feature. See the PID Auto Switch section for more information. The range is –300 to 4000. NOTE: PID switch points are based on Temperature PV, not Setpoint or Ramp Temperature.
Setpoint Lower Limit
This is the lower limit of the setpoint. The range is –100 to 100.
Setpoint Upper Limit
This is the upper limit for the setpoint. The range is –100 to 100.
Positive Output Accumulator
The Positive Output Accumulator is the sum of the positive outputs (given in percentages up to one decimal place) measured each second. Therefore, if the following outputs are recorded over five seconds:
|
Output (in %) |
Second Passed |
|
100.0 |
1 |
|
99.0 |
2 |
|
99.0 |
3 |
|
98.0 |
4 |
|
97.0 |
5 |
Then the value for the Positive Output Accumulator after five seconds will be (100.0 + 99.0 + 99.0 + 98.0 + 97.0) or 493.0.
To reset the Positive Output Accumulator, simply click Edit while the Positive Output Accumulator is highlighted and confirm the reset. This will cause the Positive Output Accumulator to be reset to zero and start accumulating values again from that point.
Negative Output Accumulator
The Negative Output Accumulator is the sum of the negative outputs (given in percentages up to one decimal place) measured each second. The sum of the negative values is expressed as a positive value. This means that, if an output of -50% is recorded after one second, a value of 50 will be added to the Negative Output Accumulator. Similarly, if the following outputs are recorded over five seconds:
|
Output (in %) |
Seconds Passed |
|
-20.0 |
1 |
|
-20.0 |
2 |
|
-21.0 |
3 |
|
-21.0 |
4 |
|
-22.0 |
5 |
Then the value for the Negative Output Accumulator after five seconds will be (20.0 + 20.0 + 21.0 + 21.0 + 22.0) or 104.
To reset the Negative Output Accumulator, simply click Edit while the Negative Output Accumulator is highlighted and confirm the reset. This will cause the Negative Output Accumulator to be reset to zero and start accumulating values again from that point.
Overshoot Control Logic (No/Yes)
Overshoot control logic is activated when a large setpoint change occurs. If the logic is active and a large setpoint occurs, it sets a working setpoint at an appropriate distance from the desired setpoint to prevent the PV from overshooting the desired final setpoint. When the PV reaches or crosses this working setpoint, then the logic exponentially ramps the working setpoint to the desired final setpoint.
Ramp Detect Logic (No/Yes)
The Ramp Detect logic works in conjunction with the instrument recipe programmer. If the control loop is the temperature loop for the recipe programmer, and the OPCODE is a ramp, then the control loop does some special checks. If the Overshoot Control Logic is active, then the final setpoint of the ramp is used to determine the working setpoint band. However, the ramp setpoint is used until the band is reached. Also, once the band is reached, if the ramp is faster than the overshoot logic exponential ramp, then the program is temporarily put on hold as needed to sync the two ramps.
Ramp Level 1 Control (No/Yes) and Ramp Level 2 Control (No/Yes)
Ramp Level 1 and 2 Control are only active if the Ramp Detect logic is active.
Ramp Level 1 Control changes the working PID settings to equivalent PI settings during the ramp until the overshoot logic band is reached.
Ramp Level 2 Control is only active if the Ramp Level 1 control is active.
Ramp Level 2 Control changes the working PID settings to equivalent Prop band only settings during the ramp until the overshoot logic band is reached.
